Going Solar Doesn't Have to Cost as Much as You Think

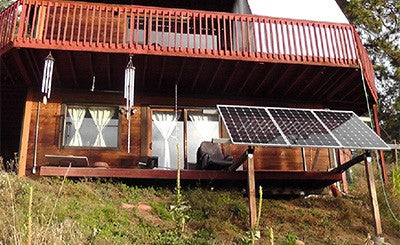
Ben's off-grid solar array used to power his office.
I admit, I already run my home with the help of a nice 8.8kW grid tie solar electric system. But in the event the power goes out, so does my big, bad solar array. Having an all electric house makes for quite a load to run off of batteries when the grid goes down. Not trusting my family to conserve power while the whole house is being backed up with batteries, I decided the only thing I really needed to run off batteries is my home office.
One may ask, what about the other loads in your house such as hot water, the refrigerator, the electric stove, yada yada? All I have to say is man existed before electricity, but current man, who works from home, needs the internet, computer and phone to survive. So I decided to take the leap to run my home office as an off grid system instead of making it grid tie with battery backup. The reason for keeping the office completely off grid now is that I also want to know what it’s like to live with a system that doesn’t have grid power or generator backup to rescue the batteries. Plus, many of my installer customers that I sell to, work with the whole range, from grid tie, grid tie with battery backup, to fully off grid, and it’s good for me to have hands-on experience with the products they work with everyday.
Sizing The System
In terms of sizing, it was pretty simple since my office loads max out at around 230 watts. Multiply 230 watts x 12 hours (some work days are longer than others) to get 2760 watt hours needed per day for the busiest day. Taking 2760 watt hours and dividing by 5 hours of solar insolation (I live at 8,000ft in the sunny Rockies so more sun and intensity than most places) gives me 552 watts of PV needed. Multiply 552 watts x 1.25% for off grid inefficiencies and I get 690 watts needed. Luckily I scored a good deal on 3 Solarworld 250’s the year before so those ended up being sized perfectly for my home system at 750 watts total. For racking, I used the IronRidge XRS system with an adjustable tilt mount to locate the panels close to my office and battery/inverter system, as shown above. IronRidge Adjustable Tilt Leg, 56…8243; (58-94…8243;) Ironridge XR-1000 Rail, 14 Foot Section, Mill
 Batteries

The other parts of the system slowly came together, as I was able to afford them over time, such as the batteries, inverter and charge controller. For batteries, I ended up using the Aquion Energy S10 stacks since this company has been on my radar for a while and I was excited to finally use their product when it became available. The major benefits of these batteries, to me, was three fold.
- They can be discharged 100% without being harmed versus most other deep cycle battery technologies out there that really don’t like going below 50% Depth of Discharge.
- They are non toxic. I believe in walking the talk and treating the environment as friendly as possible, as well as the health of my family. They use their “patented Aqueous Hybrid Ion (AHI™) battery technology that provides high performance, safe, sustainable, and cost-effective energy storage for long-duration stationary applications. Aqueous Hybrid Ion (AHI™) chemistry, a unique saltwater electrolyte battery technology.”
- Their ability to stand at a partial state of charge. I don’t have to worry if my system gets drawn down and I’m unable to get it fully charged during the day. This is good since I have no other energy input other than my 3 solar panels. Even though I live in CO, we can get a few days without sun once in a while.
See the higher capacity Aquion Energy S30 Batteries – now available at altE!
Sizing the Batteries
Sizing for the 3 S10 stacks is as follows. Each unit will discharge more or less amp hours depending upon the rate of discharge. For the 12 hour rate, each S10 stack (mine were set at 48V each) can discharge 36 amp hours. 36Ah x 3 stacks x 48VDC = 5184 watt hours total storage, so I roughly have about 2 days of backup currently. So far, I’ve run the battery down to 32%, and let me tell you, it’s a weird feeling to go below 50% Depth of Discharge and not fear the death of your batteries.
Also, as can be seen in the image below, the Aquion S10 stacks don’t use regular 2/0 or 4/0 battery cable, but standard H4 connectors just like Solar Panels. This is because the batteries are limited to 15 amps of discharge each. So in order to parallel, you’ll need to use a combiner box and will also be limited on your output by the quantity of S10 stacks you purchase. The quantity of 3 was fine for my office since 15 amps x 3 x 48VDC = 2160 watts and my loads are only around 250 watts or less. In reality the battery doesn’t like to discharge more than 8 amps for regular use, so that would in essence be 1152 watts, but still fine considering the loads.
 Inverter
For the Inverter, I selected the Xantrex XW4548 by Schneider Electric. I’ve been selling this unit and it’s big brother, the XW6048, for years and finally got to be able to use one myself – what a great unit it is. It pairs so well with their load enclosure, the XW Power Distribution Panel and their monitoring system the ComBox. For my current situation it’s a bit big, but after a year of keeping my office off grid, I plan on upgrading my battery bank and servicing more loads/circuits in my home (kitchen for running fridge and freezer, and well pump since the inverter can also power 240VAC loads as well as 120VAC). I also plan on grid tying my array so any overproduction can go toward my growing kWh overproduction bank.
Charge Controller
For the charge controller, I’m currently using the Midnite Classic 150 along with the MidNite Whiz Bang Jr for battery bank metering. I like how the shunt-based Whiz Bang Jr shows the battery state of charge on the same status screen as the charge controllers solar output. I will say that having to upload the firmware of the Classic 150 was a pain, since the Whizbang wouldn’t work without the latest version, but after having the ComBox and seeing how easy it is to view my system, I am going to switch the the Xantrex XW MPPT 60A Charge Controller instead. This way I can also view my solar production on the same ComBox platform. Currently the ComBox only reads data from other Schneider/XW devices. This will also allow me to know both controllers intimately so to further expand my customer service abilities in direct wiring questions. In fact,another idea is to have a dual side by side with similar arrays? Hmmm, another time with more money than I have now. 😉
All in all I’m happy with my first off grid install, including installing my own dedicated AC socket that runs entirely off my system, as shown below in my office picture where you’ll see a LED light socket in the lower right hand corner. As long as the light is on, the batteries have enough juice to run my office. In the event that the light goes out, I always have my utility socket five feet to the left that I can plug in to. Some pictures of my install are below. Remember, first shot as an educated homeowner and no external help used. In the future, when I connect my larger system to the grid, I’ll need to hire an Electrician.