

MPPT charge controllers can be a powerful component of your solar system. They not only manage the charging of the battery bank from the solar panels, but they are also able to convert the higher voltage of the solar array to the lower voltage of the battery bank. This allows you to design highly efficient solar systems.
An MPPT charge controller is rated in 3 primary ratings.
The first is simply what voltage battery banks the charge controller is designed to work with.
The second rating is the voltage input. It is critical to allow proper functionality and not damage the charge controller. A voltage window is generally given, for example between 18V and 150V for a 12V battery bank. If you size the array lower than 18V, there won’t be enough voltage from the solar panels to properly charge the battery. But if you go over the high voltage, you can permanently damage the charge controller.
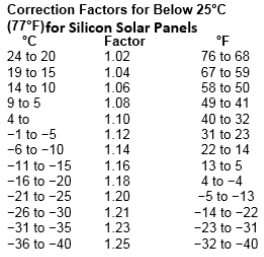
When determining the proper input voltage, cold weather must also be taken into account. Most solar panels are made of silicon. When silicon gets cold, the voltage increases. When you see a voltage rating on equipment, it is usually at Standard Test Conditions (STC), which is 25°C (77°F). Obviously, in the winter in colder climates, it gets considerably colder than that in the winter. So you must take into account the coldest temperature the solar panels will experience in the daylight.
For example, if the Voc of a solar panel is 38V, and there are three in series, and it is 30°F on a cold morning, you would use the equation 38Voc x 3 in series x 1.12= 127.68V temperature compensated. That is great for a 150V rated charge controller, but too high for a 100V.
The third rating is the output current. This is a simple equation. Watts ÷ Volts = Amps. You take the total watts of the solar array divided by the voltage of the battery bank. That will give you the output current of the charge controller. For example, a 1000W solar array ÷ 24V battery bank = 41.6A. The rating of the charge controller should be at least 40A. It is possible to “over-panel” a charge controller, where you put a higher wattage into the charge controller than it is rated for. This will allow the array to output more throughout the day when it is not putting out its peak amount. During the peak output, the charge controller will “clip” the output. It will limit it to its rating of 40A. But the rest of the day when the output is lower than 40A, it will put out the full output. Another school of thought is to undersize the array, so the charge controller is not working at it’s full rating all day, thus extending the life. Talk to your sales rep to determine if rounding up or rounding down works best for you.
If your system output is higher than a single charge controller can manage, multiple charge controllers can be used to manage the array. The outputs of each charge controller will go through its own breaker in parallel to the battery bank. Higher end charge controllers will communicate with each other, forming an intelligent network for ideal charging.